

Here are 13 playful Korean Jelly Nail Art looks that will have you reaching for your polish in no time. Each idea comes with easy, step-by-step instructions and a vivid “Picture this” to help you envision the final result. Let’s dive into these cute Korean-inspired designs and get your nails glowing with a translucent, jelly-like finish!
1. Korean Jelly Nail Art with Pastel Ombre
Add a soft gradient of two pastel jelly shades for that dreamy, glassy look. The gentle fade captures the light beautifully and feels effortlessly chic.

Step-by-step
- Prep your nails by buffing lightly and applying a clear base coat.
- Paint each nail with a coat of the lighter pastel jelly polish.
- On a makeup sponge, apply stripes of both pastel colors side by side.
- Dab the sponge onto your nail, moving slightly up and down to blend.
- Finish with a glossy top coat for that signature jelly shine.

Picture this:
You’re holding a latte under soft morning light. Your nails shift from minty green at the base to baby pink at the tips, like a pastel sunrise. Each movement catches a glimmer, making your hands look as fresh and fun as your favorite dessert.
2. Simple Korean Jelly Nail Art on Short Nails
Short nails can still pack a punch with translucent color. This minimalist jelly style keeps things clean but still eye-catching.
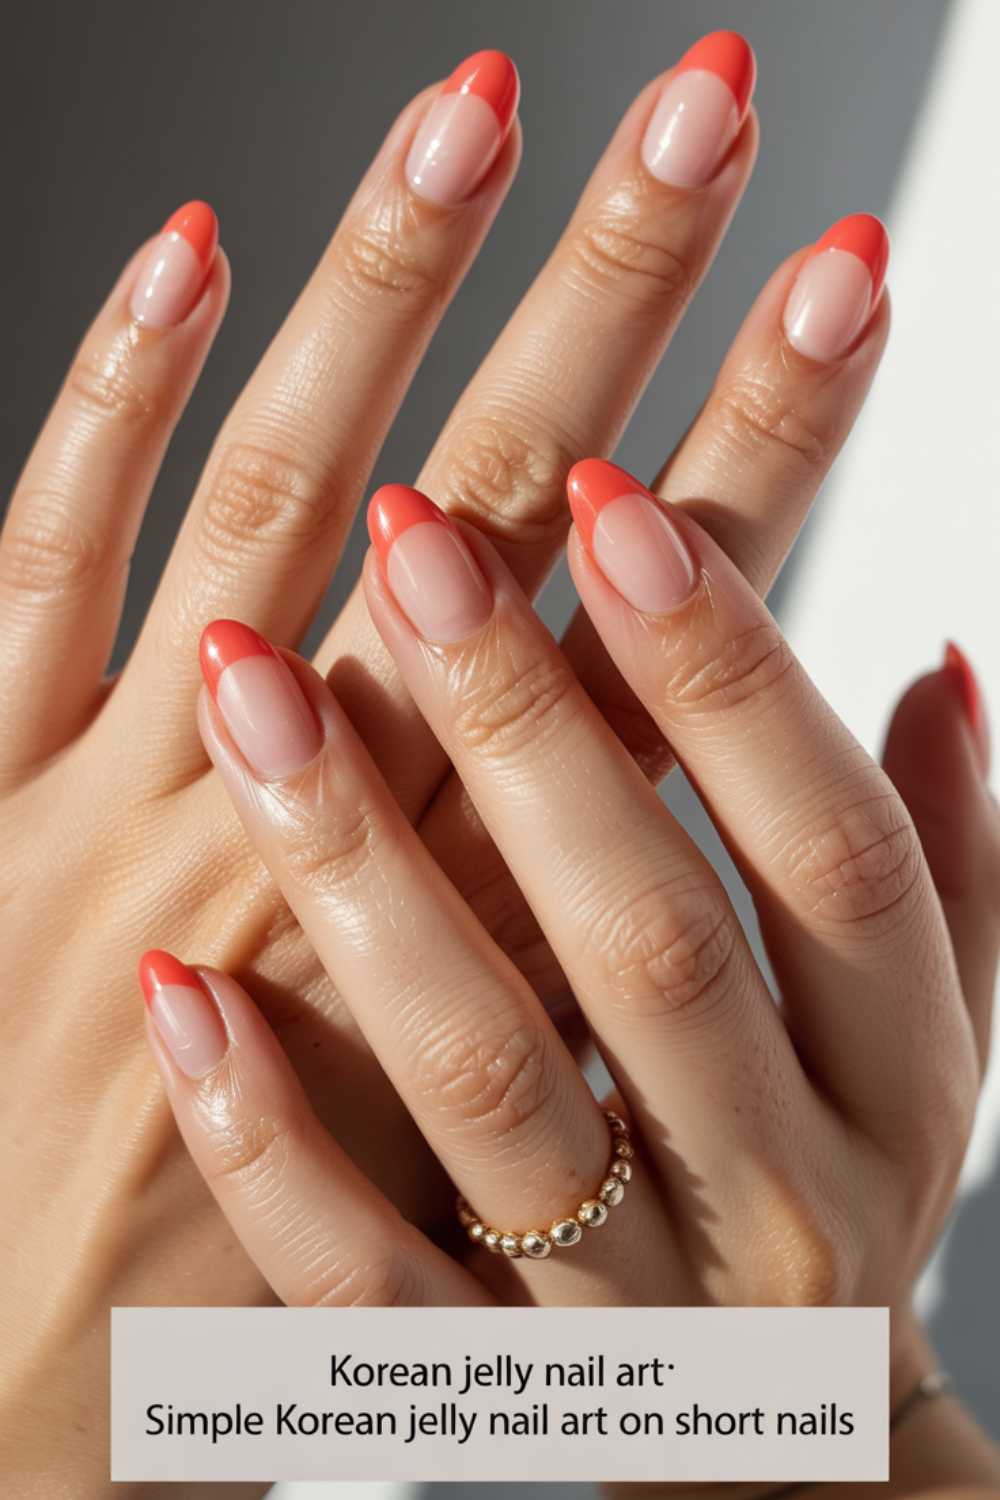
Step-by-step
- Shape and buff your short nails, then apply a clear base.
- Paint one or two thin coats of your chosen jelly shade, like sheer peach or coral.
- Let the polish dry slightly, then add a second coat if needed.
- Seal everything with a glossy top coat.
Picture this:
Your hands look neat and polished, each nail glowing with a hint of coral. The sheer tint lets natural nail beds peek through, giving off a fresh, modern vibe. It’s like wearing a light veil of color that brightens every gesture.
3. Korean Jelly Nail Art Aesthetic with Gold Foil
Combine the translucence of jelly polish with delicate gold foil for an ultra-luxe finish. The contrast between soft color and metallic flecks is so on-trend.

Step-by-step
- Apply a clear base coat and let it dry.
- Paint two coats of your jelly polish (try lilac or mint).
- While the second coat is tacky, use tweezers to place tiny gold foil pieces randomly.
- Press the foil gently so it adheres smoothly.
- Finish with two layers of glossy top coat to lock everything in.
Picture this:
Your nails look like shards of stained glass sprinkled with gold dust. Each foil fragment catches the light, creating tiny fireworks every time you move your hands. It feels playful and sophisticated all at once.
4. Kawaii Korean 3D Jelly Nail Art with Charms
Add dimensional charms—like tiny bows or pearls—to your jelly base for a cute, tactile twist. This playful 3D effect is perfect for kawaii nail art enthusiasts.

Step-by-step
- Paint two coats of a clear or pale jelly polish and let it dry until tacky.
- Use nail glue to attach small charms near the cuticle.
- Press gently and hold for a few seconds.
- Apply a generous layer of top coat around (not over) the charm to secure the edges.
- Seal the rest of the nail with a glossy top coat.
Picture this:
Your nails feel like tiny collectible art pieces, each with a pearl or bow popping off a translucent backdrop. The charms jingle softly when you type, reminding you of candy shop trinkets. It’s sweet, fun, and undeniably adorable.
5. Asian Nail Art Korean Style with Glitter Gradient
Blend fine glitter into your jelly polish for a sparkling gradient that fades toward the tip. It’s subtle but still glam.

Step-by-step
- Apply a clear base coat.
- Paint a coat of light jelly polish (sheer pink works well).
- Dip a small brush into fine loose glitter and dab near the cuticle.
- Gently drag the glitter halfway up the nail.
- Finish with a high-shine top coat to smooth out any texture.
Picture this:
Your nails look like sunlight dancing on calm water, with glitter concentrated at the base and softening toward the tips. The sparkle feels effortless and refined, like a chic evening accessory that works any time of day.
6. Korean Jelly Nail Art with Negative-Space Hearts
Create tiny heart-shaped windows by leaving negative space within your jelly polish. It’s a cute nod to the “nail art Korean style cute” aesthetic.

Step-by-step
- After your base coat, use a thin nail-art brush dipped in clear polish to paint little hearts.
- Let the hearts dry completely.
- Paint over the whole nail with a jelly shade (try light red or baby pink).
- Gently wipe away any polish over the hearts with a small brush dipped in remover.
- Seal with a glossy top coat.
Picture this:
Your nails have peek-a-boo hearts that float beneath a veil of rosy jelly. Each heart looks suspended in pastel glass, adding a flirty, playful charm to your manicure. It’s like a secret love note on your fingertips.
7. Cute Korean Jelly Nail Art with Floral Decals
Adorn your jelly base with micro floral decals for a delicate, spring-ready manicure. The decals pop against the see-through backdrop.

Step-by-step
- Apply two coats of sheer jelly polish (nude or ivory).
- Place tiny floral decals randomly on each nail while polish is tacky.
- Press decals gently to flatten any air bubbles.
- Brush on a glossy top coat to lock them in.
- Add a second top coat for extra smoothness.

Picture this:
Your nails look like pressed flowers beneath a clear candy shell. Each bloom seems suspended in gel, giving your hands a garden-inspired elegance. It feels fresh, feminine, and perfect for everyday wear.
8. Korean 3D Nail Art Jelly Ombre with Rhinestones
Combine a jelly ombre with clusters of tiny rhinestones for extra dimension and shine. This design bridges simple color blending and luxe accents.

Step-by-step
- Sponge on two pastel jelly shades in an ombre fade.
- While still tacky, position small rhinestones at the base of each nail.
- Use a dotting tool dipped in clear polish to place them precisely.
- Seal with a thick, glossy top coat—around, not over, the stones.
- Add a drop of nail glue under each rhinestone for durability.
Picture this:
Your nails fade from lavender to baby blue, crowned with sparkling gems. Light bounces off each rhinestone like tiny stars in a pastel sky. It feels like a party on your fingertips every time you glance down.
9. Korean Jelly Nail Art Simple with Matte Top Coat
Give your jelly colors a modern twist by finishing with a matte top coat. The contrast between gloss and matte is unexpectedly cool.
Step-by-step
- Paint two coats of your favorite jelly shade (try a subdued mauve).
- Wait for full drying, then apply a matte top coat.
- Allow at least five minutes for the matte effect to settle.
- If desired, add a small glossy accent (like a dot) near the cuticle.
- Seal that accent with a clear top coat to keep the matte around it untouched.
Picture this:
Your nails look like frosted glass, soft and velvety to the touch. The matte finish gives depth to the translucent color, creating a sophisticated yet playful vibe. It’s an unexpected twist on a familiar favorite.
10. Korean Nail Art Blue Jelly Tips
Keep the base clear and add just the tips in a sheer, ocean-blue jelly shade for a fun french twist. It’s fresh without being over the top.

Step-by-step
- Apply a clear base coat.
- Use nail guides or freehand a curved line for your tips.
- Paint the tips with two coats of blue jelly polish.
- Remove guides (if used) and clean edges with a brush dipped in remover.
- Finish with a glossy top coat.
Picture this:
Your tips look like waves gently lapping at sandy shores. The transparent blue sparkles in sunlight, making every gesture feel like a seaside daydream. It’s a subtle yet distinctive spin on classic nail art.
11. Korean Nail Art Red Jelly Accent Nail
Paint all nails in a pale jelly shade except one bold red accent–a nod to “korean nail art red.” This pop of color feels dynamic and fun.

Step-by-step
- Coat all nails with a sheer nude jelly polish, two thin layers.
- On your ring finger, apply two coats of translucent red jelly.
- Let everything dry, then add a clear glossy top coat to all nails.
- For extra flair, dot a tiny gold stud at the base of the red nail.
- Seal that stud with a drop of clear top coat.
Picture this:
Your ring finger shines like a ruby set in a frame of milky glass. The red jelly accent draws the eye, making every hand gesture feel like a statement. It’s playful, bold, and completely on-trend.
12. Korean Nail Art Korean Style Trends with White Polka Dots
Layer white polka dots over a colored jelly base for a playful retro vibe. The dots look like confetti trapped in clear candy.

Step-by-step
- Paint two coats of your chosen jelly shade (try pale yellow).
- Dip a dotting tool or toothpick into white polish.
- Randomly place dots of varying sizes across each nail.
- Let the dots dry, then apply a glossy top coat.
- If any dots bleed, clean edges with a small brush and remover.

Picture this:
Your nails resemble a carefree confetti shower, with crisp white dots dancing over sunshine-yellow glass. Every wave of your hand looks celebratory, like you’re throwing a party for your fingertips.
13. Minimalist Korean Nail Art Simple Cute with Nude Jelly
Embrace a barely-there nude jelly look that highlights the natural nail underneath. It’s the ultimate in effortless, understated charm.

Step-by-step
- Shape and buff, then apply a clear base coat.
- Paint two thin layers of nude jelly polish.
- Allow each coat to dry fully before the next.
- Finish with a glossy top coat for extra shine.
- Clean up edges with a small brush dipped in remover.

Picture this:
Your nails gleam with a soft nude tint, letting the natural texture shine through. The understated finish feels like a secret luxury—quiet, refined, and utterly charming. Every gesture becomes graceful, like wearing a whisper of color rather than a bold statement.
Enjoy experimenting with these 13 Korean Jelly Nail Art looks! Each one brings its own blend of color, texture, and flair to keep your manicure game fresh and fun.
Other Articles

11 Dreamy Mint Green Nail Art Looks You’ll Love


