15 Easy Abstract Acrylic Nail Art Design ideas for Trendy, Eye-Catching Nails
Welcome to your ultimate guide to abstract nail art designs! This blog post is all about giving you 15 simple yet stunning ideas to transform your acrylic nails into mini masterpieces. Each design is carefully crafted for enthusiasts who love creative, elegant, and trend-setting nail art. Whether you’re a beginner or a seasoned pro, these abstract nail art ideas will inspire you to experiment with bold lines, geometric shapes, and unexpected color splashes. Let’s dive into these fun and easy designs that will leave your nails looking fabulous and uniquely yours.
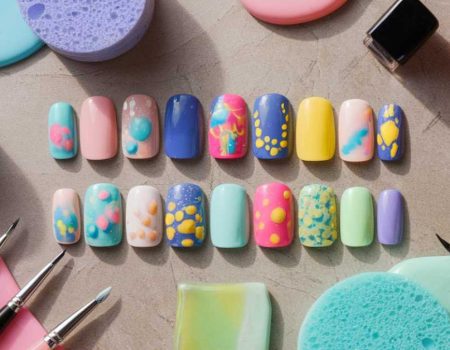
1. Abstract Color Splash

Step-by-step
- Begin with a clear or nude base coat on your acrylic nails.
- Apply a couple of layers of your chosen pastel or vibrant acrylic colors.
- Use a fine brush to flick random drops of contrasting color for a splatter effect.
- Blend softly with a tiny sponge for a fluid, abstract appearance.
- Seal the design with a glossy top coat for a polished finish.
Picture this: Imagine a canvas of soft pastel hues with splashes of bold color randomly scattered across your nails. The look is dynamic and full of life, reminiscent of a modern art masterpiece. Your nails exude creativity, making them perfect for a day out on.
2. Geometric Abstract

Step-by-step
- Start with a solid, neutral base on your acrylic nails.
- Use striping tape to section off geometric areas.
- Fill in each section with alternating bright and muted acrylic colors.
- Remove the tape to reveal crisp, clean lines.
- Add a second layer of clear top coat for durability and shine.
Picture this: Envision clean lines and sharp angles with a burst of colors defining each shape. The design is both modern and artistic, combining simplicity with striking contrast. Every nail becomes a mini geometric sculpture that grabs attention with its precise and playful look.
3. Abstract Line Art

Step-by-step
- Begin with a matte base coat to allow the lines to pop.
- Using a fine nail art brush, draw thin, flowing abstract lines in black or metallic.
- Vary the thickness and direction of the lines for a dynamic feel.
- Highlight certain lines with a dab of bright color.
- Finish with a satin top coat to add subtle shine without overpowering the lines.

Picture this: Picture your nails adorned with elegant, hand-drawn lines that twist and turn in a graceful dance. The interplay of matte and metallic creates an aura of sophistication with a modern twist. Your nails look like a piece of abstract art, effortlessly stylish and deeply unique.
4. Tie Dye Abstract

Step-by-step
- Apply a white or light-colored base coat on your acrylic nails.
- Dab on drops of several acrylic colors randomly across each nail.
- Use a thin brush or a toothpick to gently swirl the colors together.
- Create a marbled effect by blending the edges where colors meet.
- Top with a clear high-gloss coat to intensify the vibrant swirls.
Picture this: Imagine a tie dye explosion on your nails, where colors mix and merge in unexpected ways. The design radiates energy and fun, giving each nail a one-of-a-kind appearance. This playful, abstract look is both trendy and effortlessly cool, making it a standout feature of your style.
5. Minimalist Abstract Dots

Step-by-step
- Start with a pale base coat on your acrylic nails.
- Using a dotting tool, place small dots of varying sizes and colors randomly.
- Focus on a minimalistic pattern that leaves ample negative space.
- Accent some dots with a subtle glitter polish for an extra sparkle.
- Seal with a matte or semi-gloss top coat for a balanced finish.
Picture this: Visualize a canvas of understated elegance with strategically placed dots that speak volumes. The minimalist approach enhances the beauty of each dot, creating a sense of calm and creativity. Your nails achieve a perfect harmony between simplicity and artistic flair.
6. Abstract Gradient Fade

Step-by-step
- Apply a white or light base coat as a clean starting point.
- Choose two or three acrylic colors and apply them at different sections of the nail.
- Use a makeup sponge to blend the colors together for a seamless gradient.
- Enhance the effect by lightly brushing over the transitions with a contrasting color.
- Protect your design with a clear, glossy top coat for a smooth finish.
Picture this: Picture a smooth gradient that gently transitions from one vibrant shade to another across your nails. The color blend creates an ethereal, dreamy vibe that captures the eye. Each nail looks like a tiny sunset or sunrise, offering a serene yet captivating visual experience.
7. Abstract Brush Strokes

Step-by-step
- Begin with a neutral or lightly tinted base coat on your acrylic nails.
- Using a flat brush, apply broad, sweeping strokes of acrylic paint in varying colors.
- Experiment with layering strokes and allowing colors to overlap.
- Use a fine brush to add delicate highlights or fine lines on top.
- Finish with a layer of clear top coat to lock in the design.

Picture this: Imagine the flair of a painter’s brush strokes sweeping across your nails like a vibrant mural. The combination of bold and delicate lines creates a dynamic, artistic effect that feels both spontaneous and sophisticated. Your nails are transformed into tiny canvases that capture the spirit of creativity and art.
8. Abstract Metallic Accents

Step-by-step
- Start with a solid colored base coat on your acrylic nails.
- Use a thin brush to add streaks or splatters of metallic acrylic polish.
- Integrate gold, silver, or rose gold for a luxurious contrast.
- Enhance the metallic look with subtle accents in a complementary color.
- Seal the design with a high-gloss top coat to amplify the shine.

Picture this: Envision your nails glowing with metallic highlights that catch the light with every movement. The interplay of solid color and shimmering accents creates a sophisticated yet edgy look. This design exudes luxury and modernity, making your nails the center of every stylish ensemble.
9. Abstract Mosaic

Step-by-step
- Apply a neutral or light base coat on your acrylic nails.
- Use a fine nail art brush to draw irregular mosaic shapes.
- Fill each section with different acrylic colors, focusing on a balanced composition.
- Allow some white space to show through for added contrast.
- Top with a clear glossy coat to seal and enhance the mosaic pattern.
Picture this: Imagine a mosaic of tiny, colorful tiles arranged in an abstract pattern across your nails. Each segment offers a burst of color, creating a dynamic and visually captivating effect. Your nails turn into artful puzzles that are intriguing, unique, and perfect for those who love a touch of eclectic charm.
10. Abstract Splatter with a Twist

Step-by-step
- Begin with a dark or neutral base coat on your acrylic nails.
- Using a toothbrush or splatter brush, flick contrasting acrylic colors onto your nails.
- Incorporate a mix of matte and gloss paints for varied texture.
- Enhance the effect by layering splatters with a steady hand.
- Seal with a clear top coat to unify the design and add shine.
Picture this: Picture your nails as a canvas of rebellious splatters with unexpected twists of matte and gloss. The dynamic mix of textures creates an edgy, urban vibe that stands out. Every flick of color adds a sense of spontaneity and artistic flair, making your nails a true conversation starter.
11. Abstract Negative Space

Step-by-step
- Start with a full base coat in your chosen neutral color.
- Use striping tape or nail stencils to protect sections of the nail.
- Paint the exposed areas with bold, contrasting acrylic colors.
- Carefully remove the tape or stencils to reveal clean, untouched negative space.
- Finish with a glossy top coat to enhance the contrast between colors and space.

Picture this: Imagine your nails showcasing a perfect balance between vibrant color and the beauty of simplicity. The negative space adds a modern edge to the design, creating a striking contrast that draws the eye. The result is a sophisticated, artful look that feels both trendy and timeless.
12. Abstract Watercolor Effect

Step-by-step
- Begin with a white or light-colored base coat on your acrylic nails.
- Apply diluted acrylic paints using a fine brush for a watercolor effect.
- Blend different hues to create soft transitions and subtle overlaps.
- Use a sponge to further merge the colors for a seamless gradient.
- Seal the design with a clear top coat to protect the delicate watercolor finish.

Picture this: Picture your nails as delicate canvases, washed in gentle hues that softly blend into one another. The watercolor effect is light, airy, and remarkably artistic. Each nail looks like a tiny masterpiece that exudes a serene and captivating charm, perfect for a sophisticated yet playful style.
13. Abstract Stenciled Shapes

Step-by-step
- Start with a clear or light base coat on your acrylic nails.
- Choose a variety of abstract stencils and place them on your nails.
- Fill in the stenciled areas with bold acrylic colors.
- Remove the stencils carefully to reveal crisp, abstract shapes.
- Top with a clear coat to protect and add depth to the design.

Picture this: Imagine your nails decorated with perfectly stenciled shapes that burst with vibrant color. The precision of the shapes combined with the bold hues creates an eye-catching contrast. Every nail tells its own artistic story, making your manicure both unique and irresistibly stylish.
14. Abstract French Twist

Step-by-step
- Begin with a classic French tip base on your acrylic nails.
- Instead of a solid white tip, use abstract patterns in multiple colors.
- Paint freeform lines and dots along the tip, blending them into the base.
- Add a subtle gradient effect to transition between colors.
- Finish with a clear top coat to unify the design and enhance the polish.

Picture this: Picture the timeless elegance of French tips transformed with a burst of abstract creativity. The playful patterns on the tip contrast beautifully with the traditional base, creating a modern twist on a classic look. Your nails shine with a fresh, artistic vibe that is both sophisticated and full of personality.

15. Abstract 3D Accents

Step-by-step
- Start with a smooth, neutral base coat on your acrylic nails.
- Use a 3D nail art gel or acrylic to create raised abstract shapes.
- Incorporate various textures and colors for added dimension.
- Blend the raised elements into the base for a harmonious design.
- Cure properly and seal with a clear, durable top coat for lasting shine.
Picture this: Imagine your nails coming to life with intricate 3D accents that add a tactile, sculptural quality. The raised elements catch the light and create a playful shadow effect, adding depth and texture to your manicure. Your nails become a statement piece, merging art and innovation into a stunning display of creativity.
Embrace these 15 easy abstract acrylic nail art designs and let your creativity flow. Each idea is designed to be practical, ensuring you have a chic, eye-catching look that’s uniquely yours. Enjoy experimenting with these playful designs and share your journey of artistic self-expression with the world!


